라즈베리파이와 안드로이드 어플리케이션에서 서버에 요청하고 객체탐지 연산 결과를 수행하여 다시 모바일 어플리케이션으로 보내주는 방식으로 서버를 구축 해보려고 한다.
2025.01.22 - [CV/프로젝트] - [Raspberry Pi] 라즈베리파이에서 YOLO11 Pose 써보기
[Raspberry Pi] 라즈베리파이에서 YOLO11 Pose 써보기
모바일 어플리케이션 서비스를 준비하는데 USB 카메라를 통해 라즈베리파이에서 자체 연산을 통해 자세 추정을 할 수 있는지 사용해 보았다. 이 포스팅은 이전글에서 원격 접속 세팅과 OpenCV를
c0mputermaster.tistory.com
모바일 장치를 이용해 자세 추정을 통해 실내 스포츠 보조 서비스를 구현하려고 하는데 이전 포스트에서 Raspberry PI 자체에서 YOLO Pose 연산을 수행하여 보았는데 나노 모델을 사용하였어도 이미지 한 프레임당 프로세싱 속도만 1초가량 걸려서 이미지를 처리한다면 괜찮은 속도이지만 우리는 동영상을 처리해야 하기 때문에 fps가 60 만 되더라도 1초 동영상의 처리가 1분이 넘게 걸린다.

그래서 모바일에서 처리하지 않고 서버를 이용해 라즈베리 파이에서 동영상과 요청을 서버로 보내면 서버에서 연산을 처리하고 결과를 다시 모바일로 보내주는 방식으로 서버를 설계 해볼 생각이다. 모바일 어플리케이션을 타겟으로 서비스 할 예정이기 때문에 Spring Boot를 통해 API를 구현 할 예정이라 우선 Spring Boot 환경부터 구축 하였다.

Sprting boot에서는 유저의 요청과 응답을 위주로 처리하고 파싱 받은 동영상들은 Flask 서버를 통해 처리하여 돌려주도록 초기 시스템 아키텍쳐를 구상하였다. 그리고 간단한 비전 연산들은 서버로 영상을 넘겨 주기 전에 처리하고 싶어서 라즈베리 파이 뿐 아니라 좀 더 모바일 AI 연산 장치에 특화된 퀄컴사에 RUBIK Pi를 사용하여 볼 생각이다. RUBIK Pi는 다음번에 포스팅 하여보겠다.
initializer를 통하여 3.41 / Java 17 버전으로 생성

TestController.java
package capstone.SportyUp.SportyUp_Server.web.controller;

import org.springframework.core.io.FileSystemResource;
import org.springframework.http.*;
import org.springframework.util.LinkedMultiValueMap;
import org.springframework.util.MultiValueMap;
import org.springframework.web.bind.annotation.PostMapping;
import org.springframework.web.bind.annotation.RequestMapping;
import org.springframework.web.bind.annotation.RequestParam;
import org.springframework.web.bind.annotation.RestController;
import org.springframework.web.client.RestTemplate;
import org.springframework.web.multipart.MultipartFile;
import org.springframework.web.util.UriComponentsBuilder;

import java.io.File;
import java.io.IOException;
import java.net.URI;

@RestController
@RequestMapping("/test")
public class TestController {

    private static final String UPLOAD_DIR = "C:\\Users\\     x     \\src\\main\\resources\\cam\\";

    private final String FLASK_SERVER_URL = "http://127.0.0.1:5000";  // Flask 서버 URL (예시: http://localhost:5000)

    @PostMapping("/message")
    public ResponseEntity<String> messageTest(@RequestParam String request){
        System.out.println(request);
        return ResponseEntity.ok(request);
    }

    @PostMapping("/cam")
    public ResponseEntity<String> camTest(@RequestParam("file") MultipartFile file){

        if (file.isEmpty()) {
            return ResponseEntity.badRequest().body("파일이 비어 있습니다.");
        }

        try {
            // 저장할 경로 설정
            File directory = new File(UPLOAD_DIR);
            if (!directory.exists()) {
                directory.mkdirs(); // 디렉터리 없으면 생성
            }

            // 저장할 파일 객체 생성
            File destination = new File(UPLOAD_DIR + file.getOriginalFilename());
            file.transferTo(destination);

            // Flask 서버로 파일 전송
            sendFileToFlask(destination);

            return ResponseEntity.ok("파일 업로드 성공: " + destination.getAbsolutePath());

        } catch (IOException e) {
            e.printStackTrace();
            return ResponseEntity.status(500).body("파일 저장 중 오류 발생");
        }
    }

    private void sendFileToFlask(File file) throws IOException {
        RestTemplate restTemplate = new RestTemplate();

        // Flask 서버에 보낼 파일 설정
        MultiValueMap<String, Object> body = new LinkedMultiValueMap<>();
        body.add("file", new FileSystemResource(file));

        // HTTP 요청 헤더 설정
        HttpHeaders headers = new HttpHeaders();
        headers.setContentType(MediaType.MULTIPART_FORM_DATA);

        // HTTP 요청 엔티티 생성
        HttpEntity<MultiValueMap<String, Object>> entity = new HttpEntity<>(body, headers);

        try {
            // Flask 서버의 /upload 엔드포인트로 파일 업로드 요청
            URI uri = UriComponentsBuilder.fromHttpUrl("http://127.0.0.1:5000/upload").build().toUri();
            ResponseEntity<String> response = restTemplate.exchange(uri, HttpMethod.POST, entity, String.class);

            // 응답 처리
            if (response.getStatusCode() == HttpStatus.OK) {
                System.out.println("Flask 서버로 파일 업로드 성공");
            } else {
                System.out.println("Flask 서버 업로드 실패: " + response.getStatusCode());
            }
        } catch (Exception e) {
            e.printStackTrace();
            throw new IOException("Error while sending file to Flask server", e);
        }
    }
}
Spring boot 서버로 응답을 요청 받으면 Spring boot에서 Flask 서버로 영상을 파싱해서 처리하도록 테스트 해보았다.
Flask 서버
플라스크 서버를 구축하기위해 가상환경을 설정하였는데 필요하면 참고
https://minha0220.tistory.com/70
Flask 개발 기초 ① 개발 환경 구축, flask 설치(+가상 환경 배치 파일 만드는 방법)
[점프 투 플라스크]를 참고해서 작성한 글입니다. https://wikidocs.net/81041 1. 파이썬 가상 환경 구축하기 프로젝트의 첫 발걸음은 가상 환경 구축으로 시작합니다. 그냥 디렉토리 하나 만들고 진행하
minha0220.tistory.com
추가로 YOLO poes 모델을 위한 세팅도 인스톨하였다.

파이썬은 3.8버전 이상 Pytorch는 1.8 이상으로 설치해야함 주의, 우선 CPU를 사용할 것 이지만 파이토치도 설치하였다.
https://pytorch.org/get-started/locally/
Start Locally
Start Locally
pytorch.org
여기서 자기 환경에 맞는 파이토치 버전 인스톨
conda install python=3.9
pip3 install torch torchvision torchaudio // CPU에서 돌릴거라 CPU 버전 파이토치
pip install flask
pip install opencv
pip install ultralytics
혹시 scipy와 numpy 버전이 충돌한다면 아래 이슈 참조
https://github.com/ultralytics/yolov5/issues/7638
scipy and numpy version dependency · Issue #7638 · ultralytics/yolov5
Search before asking I have searched the YOLOv5 issues and discussions and found no similar questions. Question Hi, I noticed that in the requirement.txt https://github.com/ultralytics/yolov5/blob/...
github.com
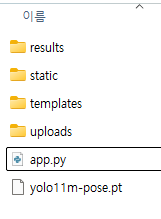
app.py
from flask import Flask, request, jsonify
import os
from ultralytics import YOLO
import shutil

app = Flask(__name__)

# 업로드 폴더 설정
UPLOAD_FOLDER = 'uploads/'
RESULT_FOLDER = 'results/'  # 결과 폴더 설정
app.config['UPLOAD_FOLDER'] = UPLOAD_FOLDER
app.config['RESULT_FOLDER'] = RESULT_FOLDER

# YOLO 모델 로드 (여기서는 자세 추정 모델을 로드)
model = YOLO("yolo11m-pose.pt")

# 업로드된 파일을 저장하는 엔드포인트
@app.route('/upload', methods=['POST'])
def upload_file():
    if 'file' not in request.files:
        return jsonify(message="파일이 없습니다."), 400

    file = request.files['file']

    if file.filename == '':
        return jsonify(message="파일 이름이 비어 있습니다."), 400

    # 파일 저장
    if file:
        filename = os.path.join(app.config['UPLOAD_FOLDER'], file.filename)
        file.save(filename)
        return jsonify(message=f'파일 업로드 성공: {filename}'), 200

# YOLO 모델을 사용하여 비디오에서 예측 수행하는 엔드포인트
@app.route('/process', methods=['POST'])
def process_file():
    file = request.json.get('file_filename')

    if not file:
        return jsonify(message="파일 이름을 제공해주세요."), 400

    file_path = os.path.join(app.config['UPLOAD_FOLDER'], file)

    if not os.path.exists(file_path):
        return jsonify(message="파일이 존재하지 않습니다."), 404

    # 파일 타입에 따라 비디오 또는 이미지로 처리
    file_extension = file.split('.')[-1].lower()

    if file_extension in ['mp4', 'avi', 'mov']:  # 비디오 파일인 경우
        results = model(file_path)  # 비디오 처리
        result_path = os.path.join(app.config['RESULT_FOLDER'], file)
        if not os.path.exists(app.config['RESULT_FOLDER']):
            os.makedirs(app.config['RESULT_FOLDER'])
        results.save(result_path)  # 결과를 지정된 폴더에 저장

        # 결과 비디오 반환
        result_file_path = os.path.join(result_path, 'result.mp4')
        if os.path.exists(result_file_path):
            return jsonify(message="비디오 처리 완료. 결과 비디오를 확인하세요.", result_video=result_file_path), 200
        else:
            return jsonify(message="결과를 저장하는 데 문제가 발생했습니다."), 500

    elif file_extension in ['jpg', 'jpeg', 'png']:  # 이미지 파일인 경우
        results = model(file_path)  # 이미지 처리
        result_path = os.path.join(app.config['RESULT_FOLDER'], 'image_results')
        if not os.path.exists(result_path):
            os.makedirs(result_path)
        results.save(result_path)  # 이미지 결과 저장

        # 결과 이미지 반환
        result_image_path = os.path.join(result_path, file)
        if os.path.exists(result_image_path):
            return jsonify(message="이미지 처리 완료. 결과 이미지를 확인하세요.", result_image=result_image_path), 200
        else:
            return jsonify(message="결과를 저장하는 데 문제가 발생했습니다."), 500

    else:
        return jsonify(message="지원되지 않는 파일 형식입니다."), 400

if __name__ == '__main__':
    if not os.path.exists(UPLOAD_FOLDER):
        os.makedirs(UPLOAD_FOLDER)
    if not os.path.exists(RESULT_FOLDER):
        os.makedirs(RESULT_FOLDER)
    app.run(debug=True, port=5000)
플라스크 서버에서 YOLO pose 모델을 처리 할 예정이고 추후에는 서버와 코드를 분리할 예정이다.
이건 YOLO pose를 uploads에 1 step으로 적용한 코드
app.py
from flask import Flask, request, jsonify
import os
from ultralytics import YOLO
from PIL import Image
import numpy as np
import cv2

app = Flask(__name__)

# 업로드 폴더 설정
UPLOAD_FOLDER = 'uploads/'
RESULT_FOLDER = 'results/'  # 결과 폴더 설정
app.config['UPLOAD_FOLDER'] = UPLOAD_FOLDER
app.config['RESULT_FOLDER'] = RESULT_FOLDER

# YOLO 모델 로드 (여기서는 자세 추정 모델을 로드)
model = YOLO("yolo11m-pose.pt")

# 업로드된 파일을 저장하고 바로 처리하는 엔드포인트
@app.route('/upload', methods=['POST'])
def upload_file():
    if 'file' not in request.files:
        return jsonify(message="파일이 없습니다."), 400

    file = request.files['file']

    if file.filename == '':
        return jsonify(message="파일 이름이 비어 있습니다."), 400

    # 파일 저장 경로
    filename = os.path.join(app.config['UPLOAD_FOLDER'], file.filename)

    try:
        # 폴더가 없으면 생성
        if not os.path.exists(app.config['UPLOAD_FOLDER']):
            os.makedirs(app.config['UPLOAD_FOLDER'])

        # 파일 저장
        file.save(filename)
        print(f"파일 저장 성공: {filename}")  # 로그 추가

        # 이미지 파일 처리 (YOLO 모델을 사용하여 결과 생성)
        results = model(filename)

        # 결과를 저장할 폴더가 없으면 생성
        result_path = os.path.join(app.config['RESULT_FOLDER'], 'image_results')
        if not os.path.exists(result_path):
            os.makedirs(result_path)

        # YOLO 결과로 주석이 달린 이미지를 생성 (numpy.ndarray 반환)
        annotated_image = results[0].plot()  # 결과 이미지를 얻음

        # numpy.ndarray에서 BGR -> RGB로 변환
        annotated_image_rgb = cv2.cvtColor(annotated_image, cv2.COLOR_BGR2RGB)

        # numpy.ndarray -> PIL.Image 변환
        pil_image = Image.fromarray(annotated_image_rgb)

        # 결과 이미지 저장 경로
        result_image_path = os.path.join(result_path, file.filename)

        # 이미지를 저장
        pil_image.save(result_image_path)
        print(f"결과 이미지 저장 성공: {result_image_path}")  # 로그 추가

        return jsonify(
            message="이미지 처리 완료. 결과 이미지를 확인하세요.",
            result_image=result_image_path
        ), 200

    except Exception as e:
        print(f"오류 발생: {str(e)}")  # 오류 로그
        return jsonify(message=f"파일 저장 중 오류 발생: {str(e)}"), 500

if __name__ == '__main__':
    # 폴더가 없으면 생성
    if not os.path.exists(UPLOAD_FOLDER):
        os.makedirs(UPLOAD_FOLDER)
    if not os.path.exists(RESULT_FOLDER):
        os.makedirs(RESULT_FOLDER)

    # Flask 앱 실행
    app.run(debug=True, port=5000)
다음은 서버로 요청을 보낼 라즈베리 파이쪽 코드이다.
camera_request_test.py
import cv2
import numpy as np
import sys
import time
import requests
from tkinter import Tk
from tkinter.filedialog import askopenfilename

url = "http:// x :8080/test/cam"
cap = cv2.VideoCapture(0)
cap.set(cv2.CAP_PROP_FRAME_WIDTH, 640)
cap.set(cv2.CAP_PROP_FRAME_HEIGHT, 640)

is_recording = False  # 녹화 여부
out = None  # VideoWriter 객체 초기화
start_time = None  # 녹화 시작 시간

# Tkinter 윈도우 숨기기
root = Tk()
root.withdraw()

while True:
    ret, image = cap.read()
    if not ret:
        print("카메라에서 영상을 읽을 수 없습니다.")
        break

    cv2.imshow('CAMERA', image)

    key = cv2.waitKey(30) & 0xFF

    if key == ord('p'):
        filename = f"frame_{int(time.time())}.jpg"  # 현재 시간 기반 파일명
        cv2.imwrite(filename, image)
        print(f"프레임 저장: {filename}")
        files = {"file": open(filename, "rb")}
        response = requests.post(url, files=files)

        print("응답 상태 코드:", response.status_code)
        print("응답 데이터:", response.text)

    elif key == ord('w'):  # 'w' 키를 눌러 파일 선택 대화상자 열기
        filepath = askopenfilename(title="파일 선택", filetypes=[("All Files", "*.*")])
        if filepath:  # 파일이 선택되면
            with open(filepath, "rb") as file:
                files = {"file": file}
                response = requests.post(url, files=files)

            print(f"파일 {filepath} 전송 완료")
            print("응답 상태 코드:", response.status_code)
            print("응답 데이터:", response.text)

    elif key == ord('q'):  # 'q' 키를 눌러 종료
        print("종료합니다.")
        break

cap.release()
cv2.destroyAllWindows()

우선 라즈베리파이에서 spring boot로 요청을 보내면 응답 상태 코드와 데이터를 확인하게 구성하였다.

스프링부트 서버에서는 이미지를 받아 cam 파일에 저장 후 Flask에 파싱, 그럼 Flask 서버는 이미지를 받아서 자세 추정을 처리


플라스크 서버에 이미지가 처리되고 결과를 다시 스프링 부트 > 라즈베리파이로 파싱
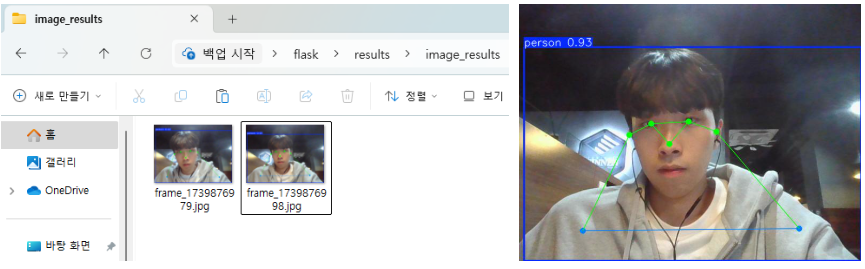
이렇게 해서 라즈베리파이와 안드로이드 어플리케이션에서 서버에 요청하고 객체탐지 연산 결과를 수행하여 다시 모바일 어플리케이션으로 보내주는 방식으로 서버를 구축해 보았다. 지금은 우선 라즈베리파이로 결과를 보내주지만 다음에는 안드로이드 어플리케이션 쪽 작업이 완료되면 어플에서도 확인 할 수 있도록 추가할 예정이다.
'Computer Vision > Project' 카테고리의 다른 글
| [Deep Learning] Partial Fine-Tuning 해보기 (0) | 2025.09.19 |
|---|---|
| [Project] Classification Model 구현해보기 (ResNet) (0) | 2025.08.12 |
| [Raspberry Pi] 라즈베리파이에서 YOLO11 Pose 써보기 (7) | 2025.01.22 |
| [Raspberry Pi] 원격 접속 세팅과 실시간 USB CAM 사용 (7) | 2025.01.21 |
| [Pose Estimation] YOLO11 Pose를 이용한 간단한 애니매이션 만들기 (6) | 2025.01.06 |